
OXID eShop, one of the leading B2B and B2C e-commerce systems.Thousands of online businesses worldwide use its extensive functionality to create optimal eCommerce solutions. With its modular, state-of-the-art and standards-based architecture, customization is very easy. OXID eShop is being developed by OXID eSales AG, the trusted Open Source eCommerce company.
The system is available in a free Open Source Community Edition (CE) with limited functionality, as well as in the Premium and Enterprise Editions (PE and EE).
PREPARING FOR INSTALLATION
Some preparations are necessary for the new installation of OXID eShop.
You can run OXID eShop on different server systems, but the following system requirements must be met to operate OXID eShop version 6.
- Apache version 2.2 or 2.4 (on Linux)
- 500 MB of free webspace for Community and Professional Edition
- 750 MB of free webspace for Enterprise Edition
- Installed mod_rewrite extension
Also you need Composer for the installation of OXID eShop.OXID eShop 6 is no longer installed based on packaged and downloadable installation packages but with the help of Composer, a dependency manager for PHP.
Installation instructions for Composer can be found in Composer website.
INSTALLATION VIA COMPOSER
Installing via composer requires you to connect to your server, you can use an SSH Client like PuTTY or simply use the build in Windows function via Windows Powershell.
The shop files are provided by Composer. Depending on the shop edition, different commands have to be run in the shell.
- COMMUNITY EDITION
composer create-project –no-dev oxid-esales/oxideshop-project your_project dev-b-6.5-ce
- PROFESSIONAL EDITION
composer create-project –no-dev oxid-esales/oxideshop-project your_project dev-b-6.5-pe
- ENTERPRISE EDITION
composer create-project –no-dev oxid-esales/oxideshop-project your_project dev-b-6.5-ee
Once Composer has finished, the new directory named with your_project will be available.
Starting the setup
Open a browser and open the shop by entering the domain or the IP of the server. You should now be able to see the graphic shop setup.
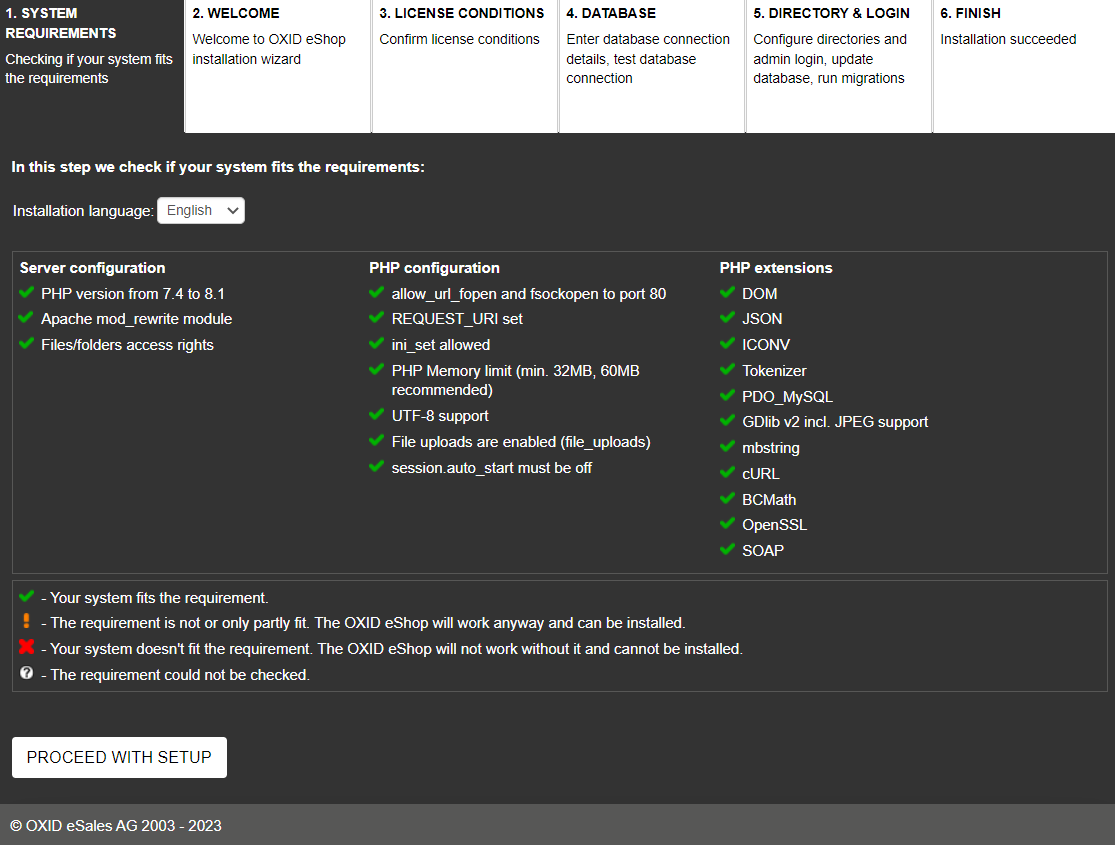
- Make sure that the green checkmarks are ticket everywhere so all system requirement are met.
- Specify main shipping country and the shop’s language and choose Start installation.
- Check the license terms and confirm them.
- Database: Decide whether you want to install the shop preconfigured with sample products. Use demo data if you want to use a test installation . If you don’t have a database yet, choose Create database now.
- Directories and Login
- FINISH
After successful installation, the /setup directory will be deleted automatically. This should prevent the setup process from being invoked again at a later time.
Error: Contact form not found.